Integrate
To integrate Autotask with the Field Nation Platform: and this is a test for leland
1. Enable Autotask Connection in Field Nation
- Login to your Buyer Administrator account at www.fieldnation.com
- Click Your Profile Icon on the right-hand side navigation and then click on Company Settings

- On the left-hand side of the screen scroll down to the Integrations section and click on Apps
- Click on Connect within the Autotask box
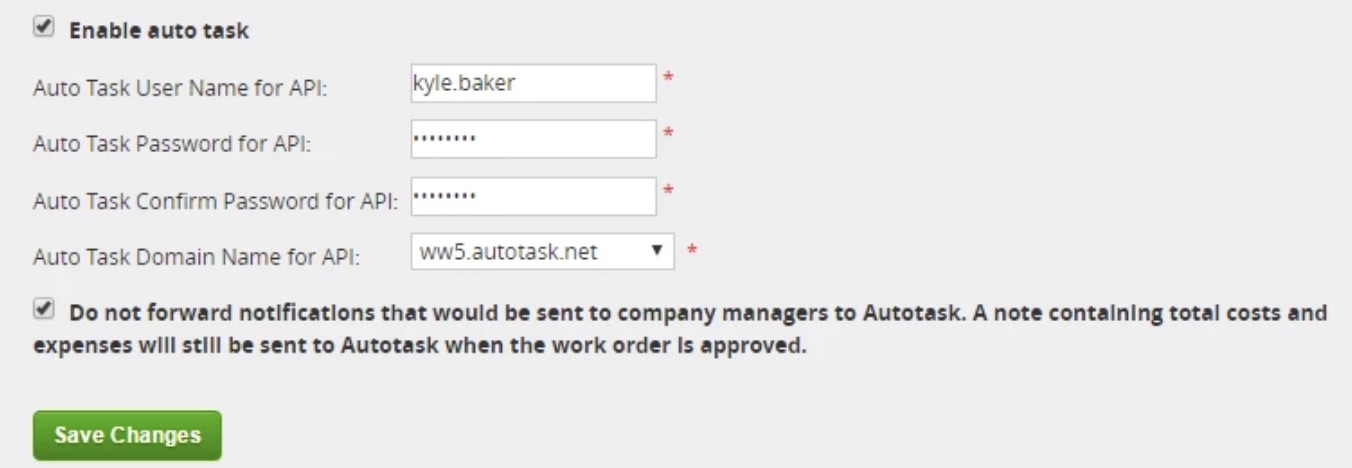
- Check the box next to Enable Autotask
- Fill in the corresponding fields with the following information:
- Provide your Autotask Administrator username in the Autotask User Name for API field
- Provide your Autotask password in the Autotask Password for API field and confirm your password in the Autotask Confirm Password for API field
- Log into Autotask and look at the URL. Back in Field Nation select which Domain Name to use (example: ww2.autotask.net)
- Check the Do not forward notifications that would be sent to company managers to Autotask. A note containing total costs and expenses will still be sent to Autotask when the work order is approved.
- Click Save Changes to save your Autotask information. Please note, the password fields become blank intentionally.
2. Install Field Nation LiveLinks in Autotask
- Login to your Administrator Autotask account at ww#.autotask.net
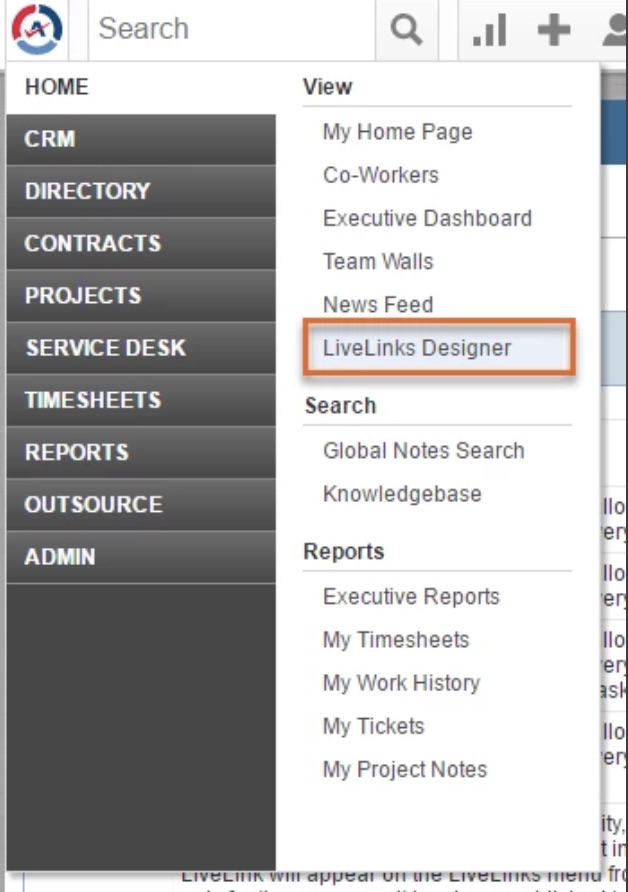
- Hover your mouse over the Admin icon on the Autotask homepage and choose "LiveLinks Designer"
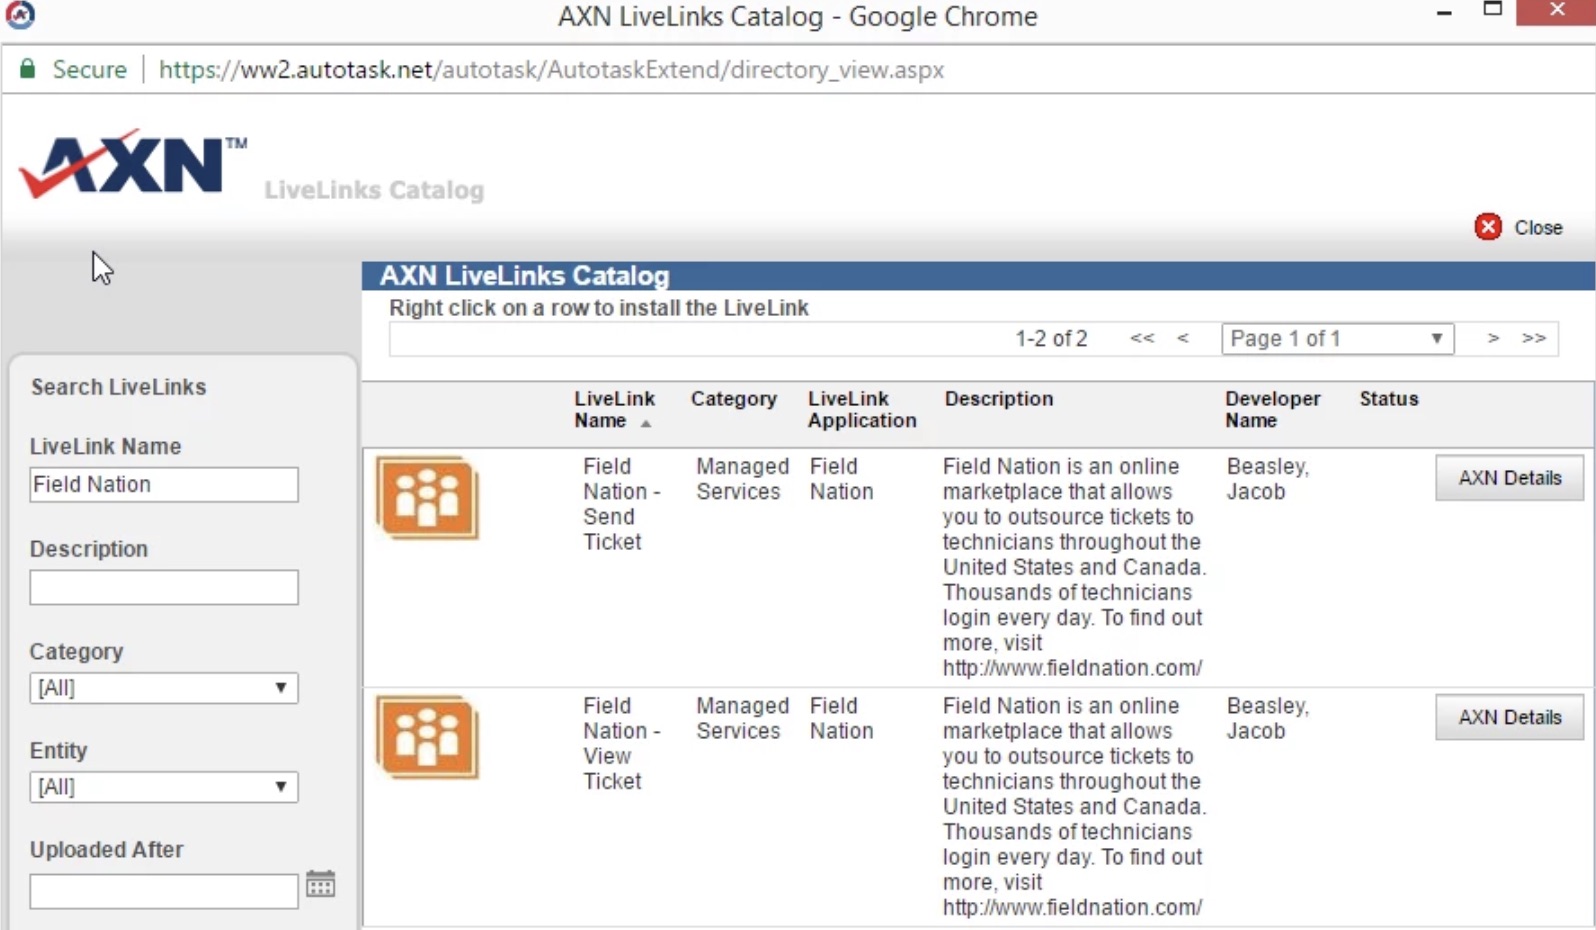
- On the "LiveLinks Designer" page select Explore the AXN LiveLinks Catalog
- From the left-hand side of the Explore AXN LiveLinks Catalog screen search for Field Nation in the LiveLink Name field and click search
- Right-click and choose Install LiveLink for both Field Nation Send and View LiveLinks
3. Configure Field Nation - Send Ticket LiveLink
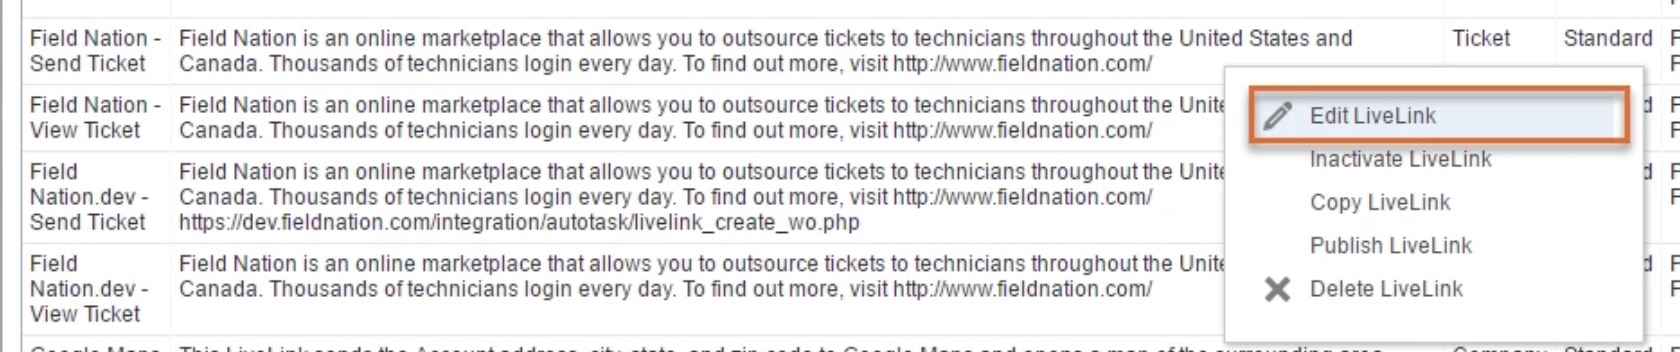
- Go back to the LiveLinks Designer page and click Field Nation - Send Ticket under the "LiveLink Name" column. Edit the LiveLink.
- Change Base URL from www. to ui.
- Ensure the URL starts with https://
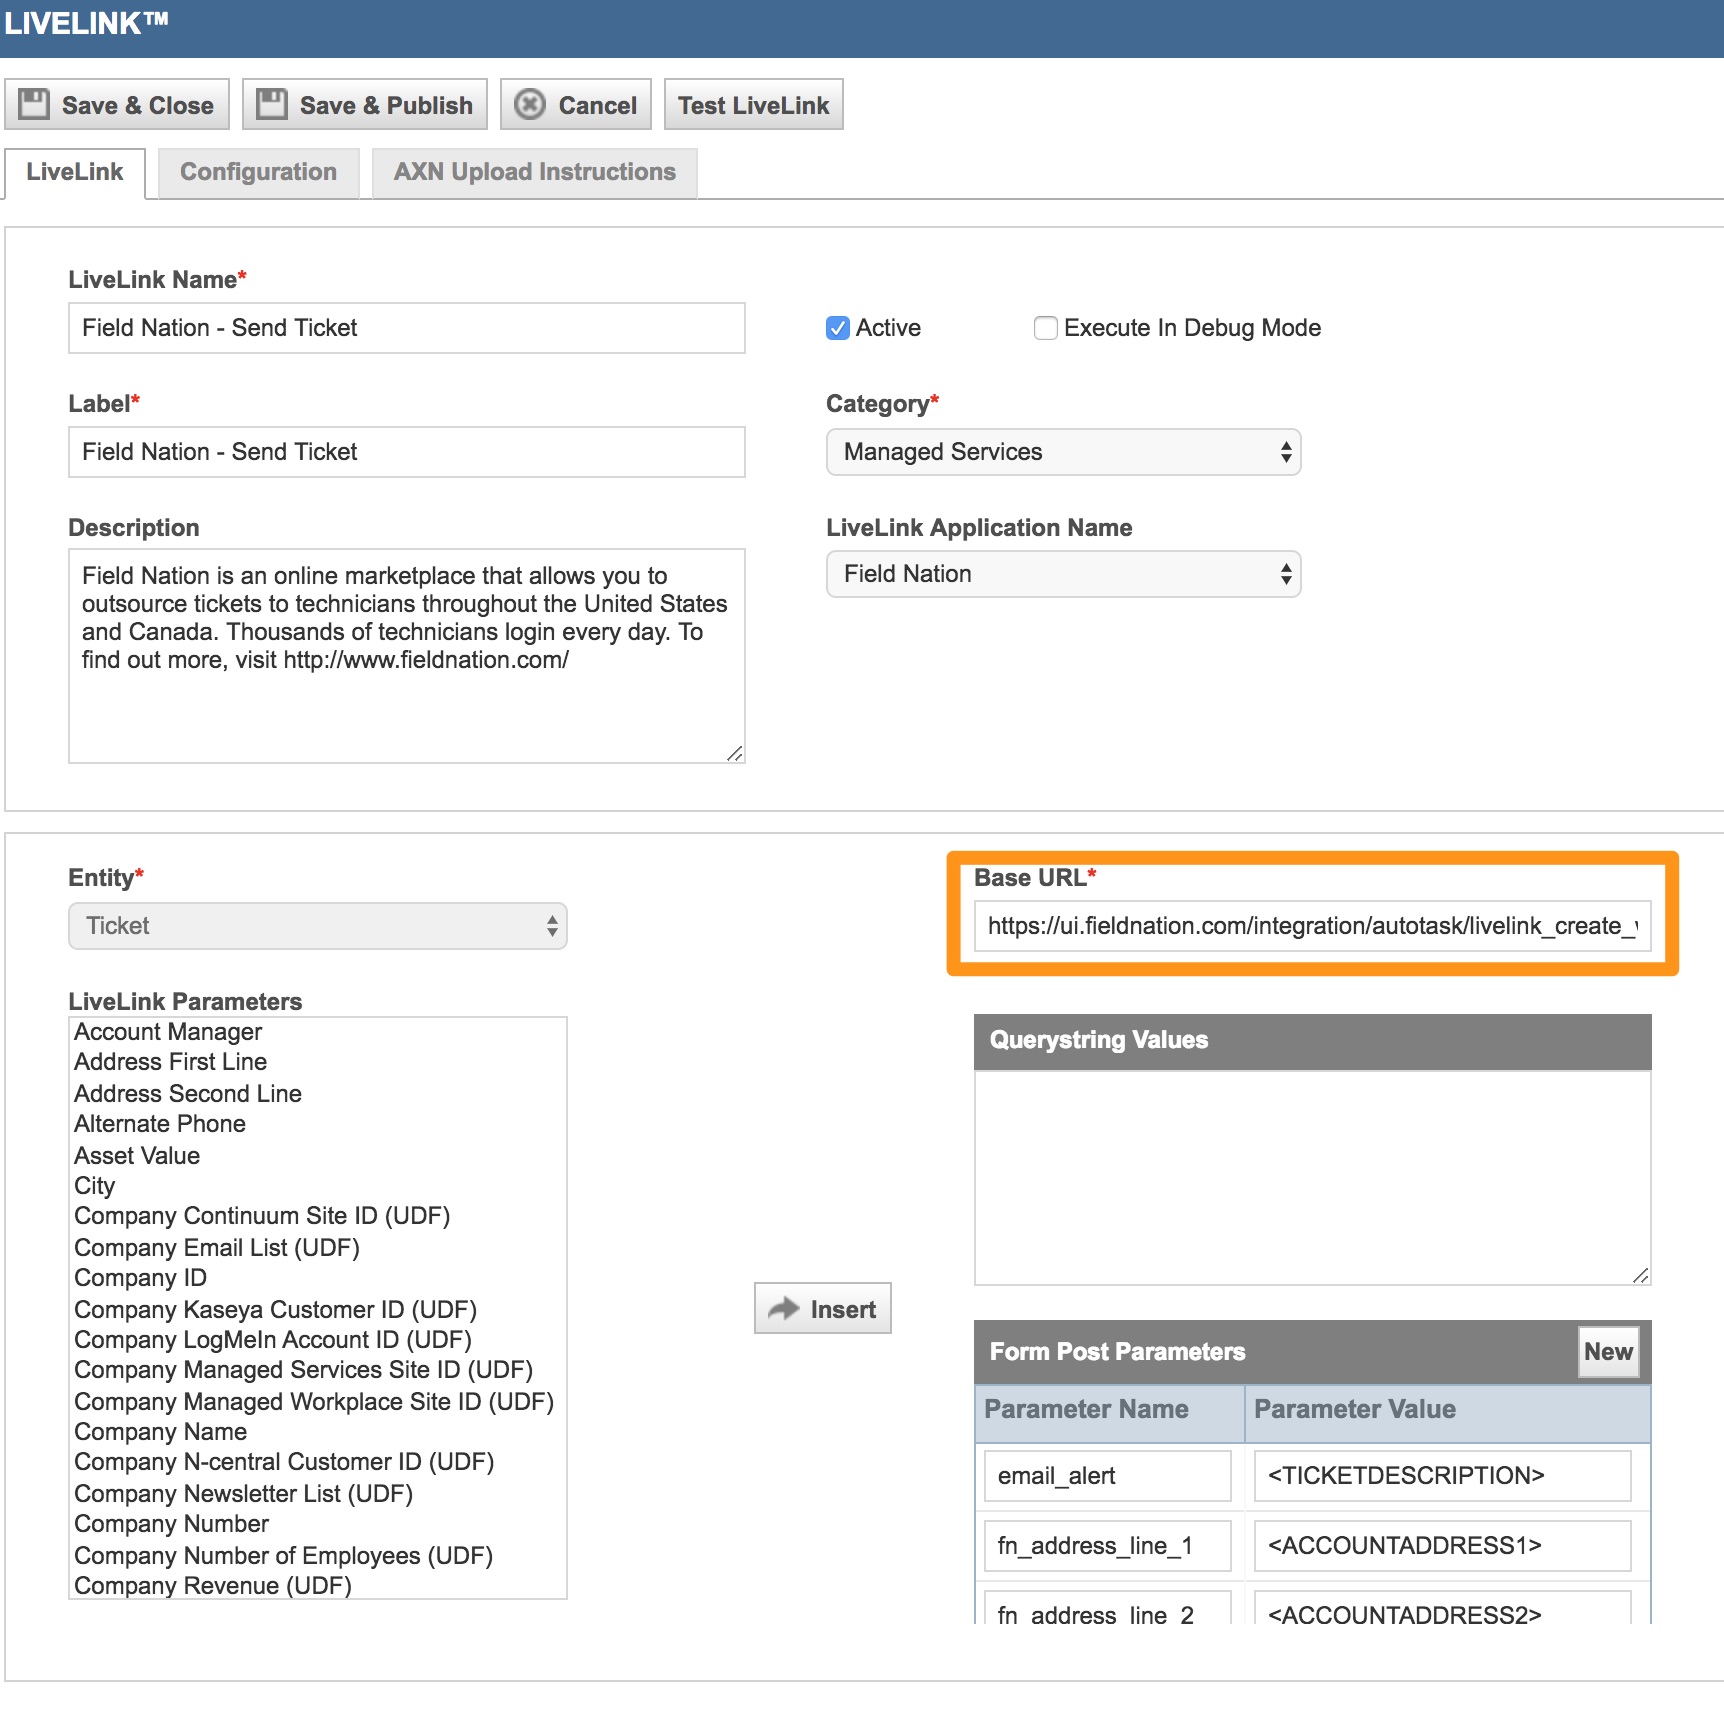
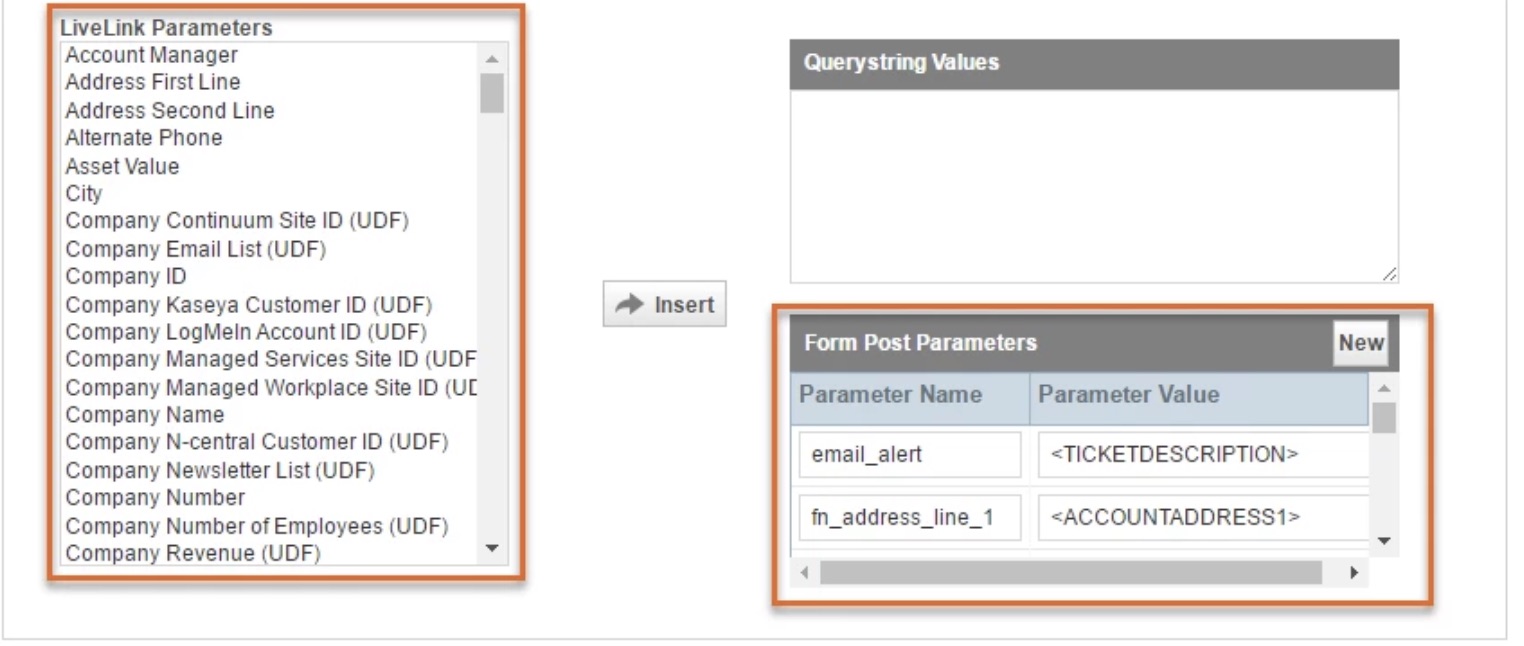
- In the Form Post Parameters section of this LiveLink, you will need to insert your user-defined fields into the "Parameters Value" fields. Follow these steps to accomplish this:
- Find the Parameter Nam" that needs a Parameter Value assigned. Click your cursor in the Parameter Value field to select it.
- Find your field in the LiveLink Parameters menu to the left and click on it so it is highlighted
- Click Insert and verify that they correct value was inserted into the corresponding Parameter Value
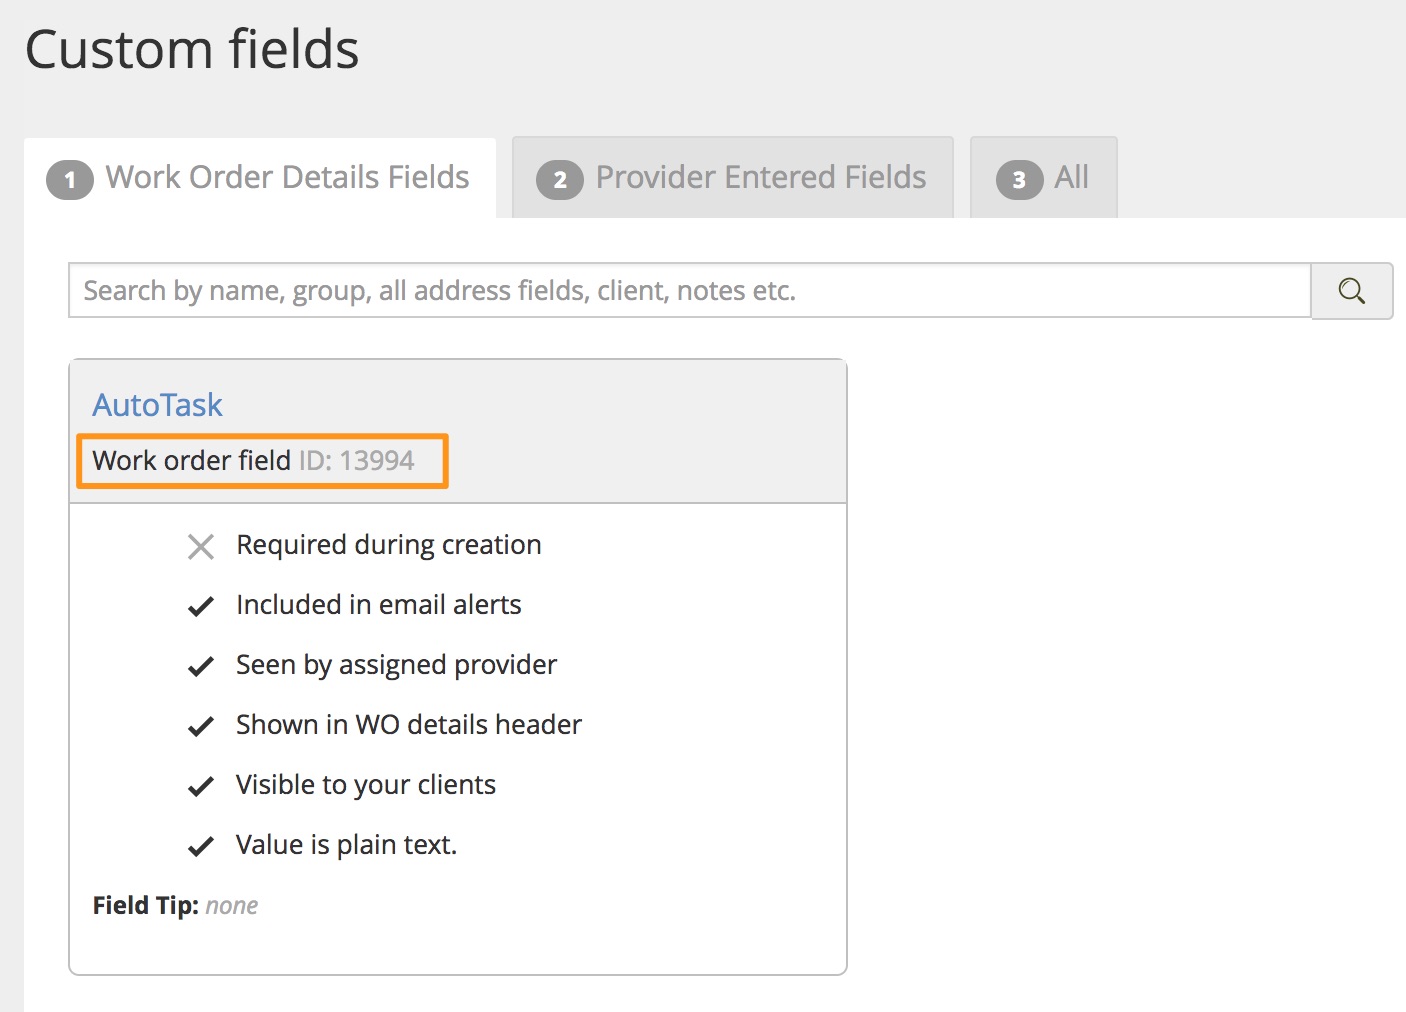
To add map fields to a Field Nation Custom Field the Parameter Name should be fn_custom_####. The fn_custom_#### can be found by navigating to the custom field management page in Field Nation. Each custom field has a unique ID, this is the fn_custom_#### to use.
Note: The parameter values that are already filled are required for Autotask and Field Nation to integrate. Do not change their values. Repeat until all necessary values are filled in.
Client, Project, Templates are not able to be mapped from Autotask to Field Nation.
When sending a ticket from Autotask to FN, and you want to update the Pay Type and Pay Rate you need to map the following user defined fields.
- FN Pay Mode
- Fixed = fixed
- Per Hour = hourly
- Per Device = device
- Blended = blended
- FN Additional Max Hours
- FN Additional Pay Rate
- FN Max Hours/Devices
- FN Pay Rate
Start Time (datetime value) = fn_workorder_time_start
End Time (datetime value) = fn_workorder_time_end
Work Type = fn_work_type
First, go into the livelinks designer. Hover over the Autotask logo in the top left corner and select Home > View > LiveLinks Designer. Once you're in the livelinks designer you can create a new livelink, or select an already configured livelink. More than likely, 2 FN livelinks will already be created -- Send Ticket and View Ticket. Click on the Send Ticket live link.
The livelink fields that we are most concerned with are the LiveLink parameters list, and the Form Post Parameters. To map the fields you need to create a "new" post parameter within the livelink. The following parameters should be configured.
| Parameter Name | Parameter Value |
|---|---|
| fn_pay_mode | <UDF-FN Pay Mode(tblTaskTicket)> |
| fn_additional_max_hours | <UDF-FN Additional Max Hours(tblTaskTicket)> |
| fn_additional_pay_rate | <UDF-FN Additional Pay Rate(tblTaskTicket)> |
| fn_max_hours_devices | <UDF-FN Max Hours/Devices(tblTaskTicket)> |
| fn_pay_rate | <UDF-FN Pay Rate(tblTaskTicket)> |
- Check the box next to Active to make this LiveLink active
- When all necessary values are filled in click Save and Publish

4. Grant Access in Autotask to Use Field Nation Send Ticket LiveLink
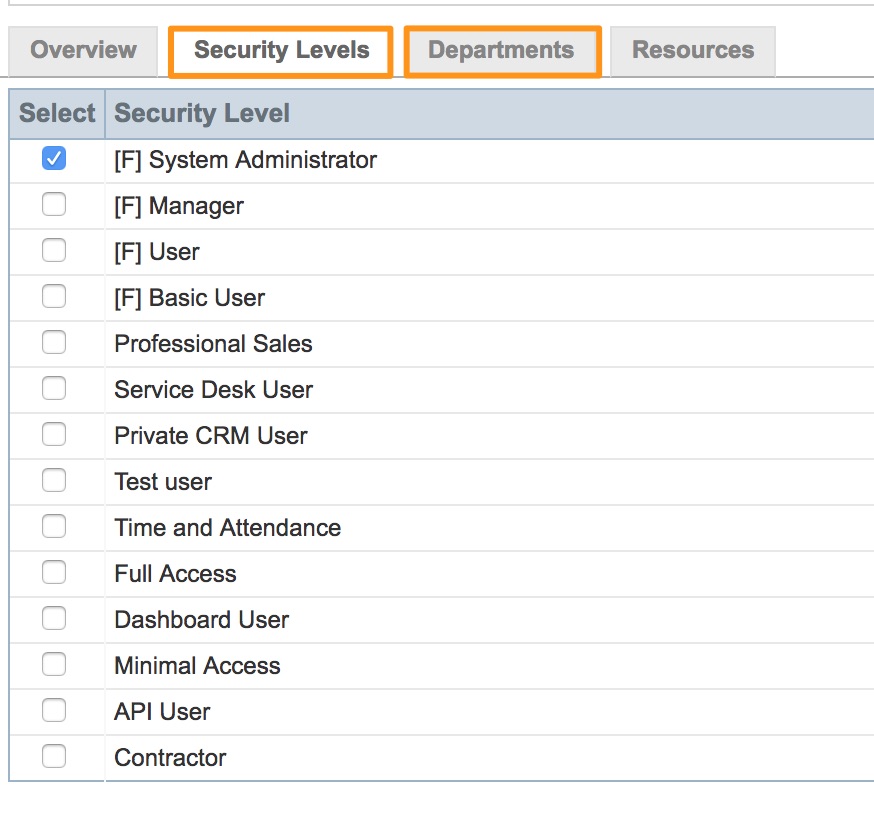
- Click the Security Levels tab
- Check the boxes next to the corresponding groups that apply to your users. This allows those users to use the LiveLinks
- Repeat steps but for the Departments tab
- Click Save & Close
5. Configure Field Nation - View Ticket LiveLink
- Go back to the LiveLinks Designer page and click Field Nation - View Ticket under the LiveLink Name column. Edit the LiveLink
- Change Base URL from "www." to "ui.*"
- Ensure the URL starts with https://
- Check Active
- Click Save and Publish
- Click Save and Close
6. Update LiveLink Access Levels
- Once you've successfully installed the Field Nation LiveLinks, go back to the LiveLinks Designer page and click the Applications tab at the top
- Click Field Nation under the LiveLink Application Name column
- Check Requires Authentication and select User-Level.
- Click Save & Close
7. Setup Autotask Users in Field Nation
Important: Once the LiveLinks on your Autotask administrator account is setup, you'll need to setup individual Field Nation user accounts for each Autotask user under your organization.
For this process, each Autotask user under your organization will also need to have an account with your Field Nation Buyer account.
- Each Autotask user will need to login to their Autotask account
- Hover your mouse over the "Person" icon on the Autotask homepage and choose "Profile"
- Click on Single Sign-On
- Right click on Field Nation and Edit Record
- Enter your Field Nation username and password information
- Save
Reminder: EVERY USER sending tickets to Field Nation will need to update their Autotask profile with their Field Nation login information.

8. Mapping Data Field Back to Autotask
- Navigate back to the Autotask management screen within Field Nation
- Select the Setup Mapping Back to Autotask button
- Select +Map Another Field
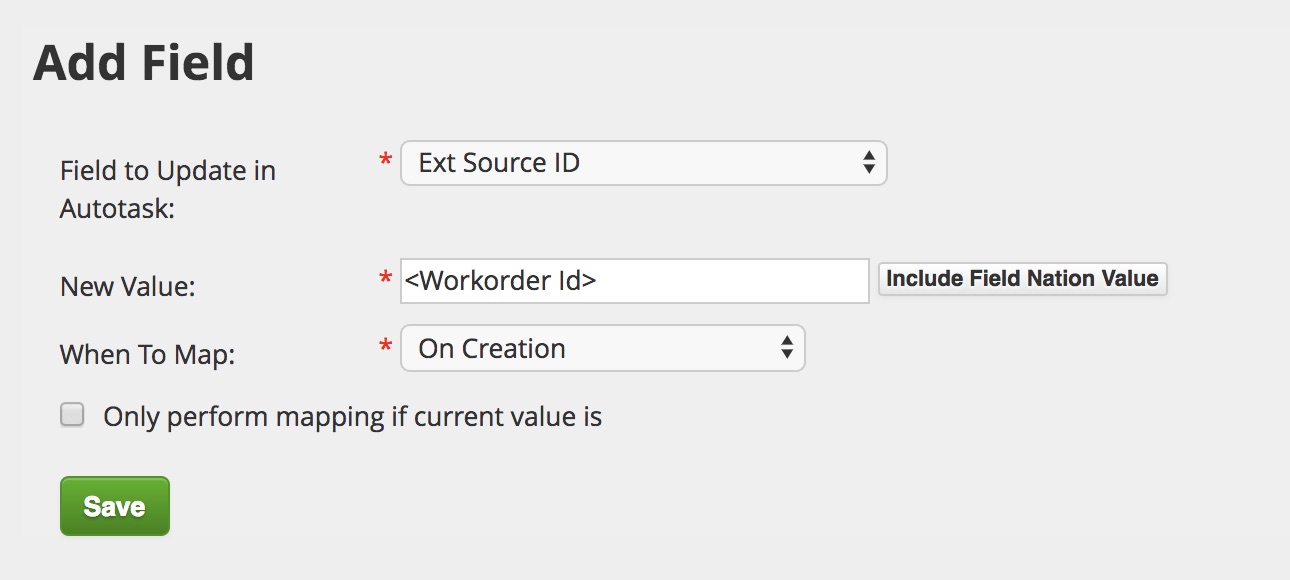
- To send back Field Nation Work Order ID back to my UDF field called Ext Source ID, select:
- Field to Update In Autotask*: Ex Source ID
- New Value*: <Workorder ID>
- When To Map*: On Creation
- Repeat for all fields that need to be mapped back to Autotask
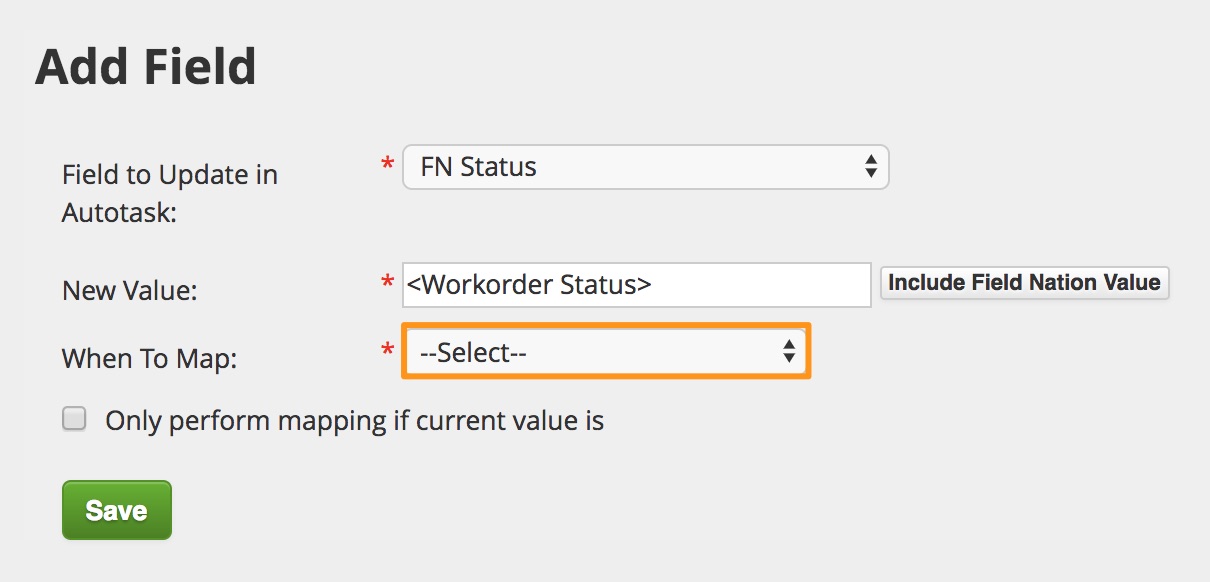
- To get every Field Nation flightboard status & sub status follow the steps below:
- Field to Update In Autotask*: Select the Autotask Field To Update With The Field Nation Status
- New Value*: <Workorder Status>
- When To Map*: --Select--
--Select--: Leaving When To Map as the --Select-- option will allow every FIeld Nation flightboard status to send when a status changes.
9. Sending Tickets to Field Nation
Once you've created a ticket on Autotask you will need to send that ticket to Field Nation.
- Click the MY WORKSPACE & QUEUE
- Click on the ticket you would like to send to Field Nation
- In the Ticket Details pop up hover your mouse over the LiveLinks tab and select Field Nation - Send Ticket. This will open a pop up to Field Nation and sign you in with the user information you have inputted into Autotask
Note: You are also able to open the Field Nation work order directly from Autotask. Open the ticket, click the LiveLinks drop-down and select Field Nation - Send Ticket
- Review the information that Autotask has auto-filled into our Create Work Order page. Add any additional information that Autotask did not fill in.
- Publish this ticket to Field Nation.
10. View Field Nation Work Orders From Autotask
- Open up a ticket on Autotask, hover your mouse over LiveLinks and select Field Nation - View Ticket to log in to Field Nation and view the progress of the ticket from Autotask
- If you are viewing your ticket on Field Nation, you can click Autotask #### to view your ticket on Autotask
Misc: Getting Custom Field Unique IDs
Below are the steps that you can use to find the fncustom#### number which is used to map an Autotask field to a Field Nation custom field.
- Login to your Field Nation Admin Account
- Select My Company - Company Manager
- Within the Work Order section select Custom Work Order Fields
- Each custom field has an internal ID which is highlighted below