Provision the Salesforce integration user, apply minimum permissions, then install and configure the Field Nation connector end-to-end.
Complete both sections in order. The Salesforce side can be handed off to your Salesforce admin to complete independently — they hand you back the credentials before you start the Field Nation side.
Have ready: Your completed reference sheet from Overview.
Estimated time: ~5 min (Path A) or ~25 min (Path B) Access needed: Salesforce System Administrator
This section provisions the service account the connector authenticates as and grants it the minimum permissions needed to read records and sync data. If you are not the Salesforce admin, share this page with them and wait for them to hand you back the credentials before starting Configure Field Nation.
This section can be done asynchronously. Your Salesforce admin can complete it independently and hand you back the credentials. You do not need to be present while they work.
| Path A — Basic Admin | Path B — Dedicated Integration User | |
|---|---|---|
| Setup time | ~5 minutes | ~25 minutes |
| Best for | Sandboxes, one-off tests | All production environments |
| Blast radius if credentials are compromised | Entire Salesforce org | Scoped to mapped objects only |
| Modify Metadata exposure | Permanent | Setup-only, removed after Step 8 |
| PoLP compliant | No | Yes |
Use this path only in non-production environments.
Go to Setup → Users → Users → New User
Set the following:
| Field | Value |
|---|---|
| First Name | FieldNation |
| Last Name | Integration |
A monitored service mailbox, e.g. fn-integration@yourcompany.com | |
| Username | Globally unique across all Salesforce orgs, e.g. fn-integration@yourcompany.com.sandbox |
| Profile | System Administrator |
Click Save
Use a service mailbox, not a personal account. Security tokens are sent to the user's email — if the account belongs to a real person who leaves, the integration breaks.
Username:      fn-integration@yourcompany.com.sandbox
Password:      (set during user creation)
Token:         (from the reset email)
Instance Type: test
Instance Name: (your subdomain, from Overview)
Path A complete. Jump to Configure Field Nation.
Follow all steps below in order.
The profile is the baseline. Using Minimum Access - Salesforce as the base means this profile grants near-zero permissions by default. Every permission the connector actually needs is added explicitly in Step 2 via a permission set.
Go to Setup → Users → Profiles
Click New Profile
Set:
| Field | Value |
|---|---|
| Existing Profile | Minimum Access - Salesforce |
| Profile Name | FieldNation Integration Profile |
Click Save
Do not add object or field permissions directly to this profile. All access is granted through the permission set in Step 2 — this separation makes it easy to audit and adjust permissions without touching the profile.
✓ Verify: The new profile appears in Setup → Users → Profiles with base access only.
Permission sets layer explicit access on top of the restricted profile. This approach lets you grant exactly what the connector needs — nothing more.
Go to Setup → Users → Permission Sets → New
Set:
| Field | Value |
|---|---|
| Label | FieldNation Integration |
| API Name | FieldNation_Integration (auto-populated from the Label — do not modify this value) |
| License | Salesforce (this field appears at the bottom of the New Permission Set form — set it before clicking Save) |
Click Save
From the permission set, click System Permissions → Edit
Enable the following:
| Permission | Enable | Remove after setup? |
|---|---|---|
| API Enabled | ✓ | No — required at runtime |
| Modify Metadata Through Metadata API Functions | ✓ | Yes — remove after setup is confirmed |
Modify Metadata Through Metadata API Functions is disabled by default in the permission set — you must explicitly enable it here.
Click Save
Why Modify Metadata? The connector automatically creates a Salesforce Workflow Rule and Outbound Message during initial configuration in Configure Field Nation. This is a one-time operation. Step 9 of this section walks you through removing this permission after setup is confirmed.
After saving the permission set, return to its main page (via Setup → Users → Permission Sets → FieldNation Integration) and click Object Settings from the menu on the left.
From the created permission set, click Object Settings
Configure each object below. Only enable what applies to your use case:
The tables below show the display names as they appear in the Salesforce Object Settings UI, followed by the API name in parentheses. The UI shows objects by display name — use the search bar to locate them quickly.
Always required:
| Object (display name) | API name | Read | Create | Edit | Notes |
|---|---|---|---|---|---|
| Your root object (e.g., Cases) | e.g., Case | ✓ | ✓ | ✓ | Remove Create if Outbound Create feature is off |
| Contacts | Contact | ✓ | Reference field lookups | ||
| Accounts | Account | ✓ | Reference field lookups |
Required if the Messages feature will be enabled:
| Object (display name) | API name | Read | Create | Notes |
|---|---|---|---|---|
| Case Comments | CaseComment | ✓ | ✓ | Default for Case root objects. If Case Comments does not appear in Object Settings, search for "Case Comment" — in some orgs this object is inherited from Case-level access and will not show up as a standalone entry. |
| Notes (Classic) | Note | ✓ | ✓ | Use if root object is not Case. Select the entry labeled Notes — not Notes & Attachments or ContentNote, which are separate objects. |
Required if using classic Attachments (attachments type):
In Object Settings, locate Attachments (Attachment). The object-level row shows Read and Create checkboxes — enable both. If you only see Available and Visible toggles (with no Read/Create checkboxes), your org has deprecated classic Attachments in favor of Salesforce Files — skip this section and use the Salesforce Files permissions below.
| Object (display name) | API name | Read | Create |
|---|---|---|---|
| Attachments | Attachment | ✓ | ✓ |
Required if using Salesforce Files (files type):
These objects may not be visible when scrolling the Object Settings list. Use the search bar at the top of the Object Settings page to locate each one by display name: search Content Version, Content Document, and Content Document Link.
| Object (display name) | API name | Read | Create |
|---|---|---|---|
| Content Versions | ContentVersion | ✓ | ✓ |
| Content Documents | ContentDocument | ✓ | |
| Content Document Links | ContentDocumentLink | ✓ | ✓ |
Required only for explicitly mapped custom objects:
Custom objects appear in Object Settings by their display label (not the __c API name). Use the search bar to locate each one. If a custom object does not appear, verify it exists under Setup → Object Manager and that the integration user's profile or license supports access to it.
| Object | API name | Read | Create | Edit |
|---|---|---|---|---|
| Each mapped custom object (by display label) | e.g., CustomObject__c | ✓ | ✓ | ✓ |
No Delete permissions are needed anywhere. The connector has no delete operations.
For each object above, open its Field Permissions within the permission set and grant Read (and Edit where the object has edit access) only on fields you intend to map. Leave all other fields with no access.
Order of operations: You configure field mappings in Configure Field Nation after this section is complete. If you are not sure which fields to include right now, grant Read on all fields for the relevant objects and return here after Configure Field Nation to tighten access to only what you mapped. Configure Field Nation will show you a dropdown of available fields — anything not appearing there needs Read access granted here.
✓ Verify: The permission set appears under Setup → Users → Permission Sets with System Permissions and Object Settings configured.
FieldNationIntegrationfn-integration@yourcompany.comfn-integration@yourcompany.com.prodSalesforceFieldNation Integration ProfileUse a service mailbox your team monitors. The security token and any authentication alerts are sent to this address.
✓ Verify: The user appears in the Users list with the FieldNation Integration Profile profile.
FieldNation Integration from Available to Enabled Permission Sets✓ Verify: FieldNation Integration appears under Permission Set Assignments on the user record.
The connector authenticates using the format password + security_token internally. You enter them as separate values in Field Nation. The token changes each time the password is reset — if you rotate the password, you must also update the token in Configure Field Nation.
✓ Verify: You received an email to the service mailbox with a subject like "Your new Salesforce security token."
Token email not arriving? Check the spam or junk folder in the service mailbox. If it is not there after 10 minutes, confirm the mailbox address on the user record is correct under Setup → Users, then click Reset Security Token again. If the mailbox uses routing rules, verify delivery to the correct folder.
Sandbox and production use separate tokens. If you are setting up both environments, generate and record a separate token for each integration user. Tokens are not shared between Salesforce orgs.
If your Salesforce org requires MFA for all users, the integration user must be exempted. API-only integrations cannot complete an interactive MFA challenge.
Check if MFA is enforced: Go to Setup → Identity → Identity Verification. If "Require MFA for all direct UI logins" is enabled org-wide, proceed with one of the options below.
Option 1 — Permission set exemption (preferred):
MFA Exemption - API Only, API Name to MFA_Exemption_API_OnlyWaive Multi-Factor Authentication for Exempt UsersOption 2 — Org-level opt-out:
If Salesforce has granted your org an MFA opt-out waiver, navigate to Setup → Identity → MFA Opt-Out. This affects all users org-wide and is not recommended unless Option 1 is unavailable.
✓ Verify: The integration user can authenticate via API without being prompted for MFA.
When you save in Configure Field Nation, the connector automatically creates a Salesforce Workflow Rule and Outbound Message that fires for all new or updated records on your work order resource. If that default behavior is what you want, skip this step.
If you want more precise control — for example, dispatch only when a user checks a box or when a status field reaches a specific value — set up a trigger field and a Record-Triggered Flow now, before Configure Field Nation.
| Approach | How it works | Best for |
|---|---|---|
| Checkbox trigger | Work order created when the user checks a custom checkbox | Teams that want explicit per-record control |
| Status trigger | Work order created when a picklist field reaches a specific value, e.g. Status = "Dispatch Required" | Automated workflows where a status change is the dispatch signal |
Go to Setup → Object Manager → [Your root object] → Fields & Relationships → New
Select Checkbox as the field type
Set:
| Field | Value |
|---|---|
| Field Label | Send to Field Nation |
| API Name | Auto-populated, e.g. Send_to_Field_Nation__c |
| Default Value | Unchecked |
Set field-level security to grant access to the profiles and users who will dispatch work
Add the field to relevant page layouts
If you want to use a Flow instead of the auto-created Workflow Rule:
Go to Setup → Flows → New Flow and select Record-Triggered Flow
Configure the trigger:
Case)Send_to_Field_Nation__c Equals TrueAdd an Action element:
If completing Configure Salesforce before Configure Field Nation (recommended), you will return here to connect the action after Configure Field Nation generates the Outbound Message.
Save the Flow with a descriptive label, e.g. Create Field Nation Work Order
Click Activate — the Flow will not run until it is Active
If you create a custom Flow, disable or delete the Workflow Rule the connector auto-created in Configure Field Nation to avoid duplicate work order creation.
Fill in your reference sheet from Overview with the values from this section:
Username:      fn-integration@yourcompany.com.prod
Password:      (set during user creation)
Token:         (from the reset email in Step 5)
Instance Type: production  (or: test)
Instance Name: (your subdomain, from Overview)Return here after Configure Field Nation is complete and the connection is confirmed working.
Once the Salesforce Workflow Rule and Outbound Message have been created automatically during Configure Field Nation, the Modify Metadata permission is no longer needed:
Modify Metadata Through Metadata API FunctionsThis removes the ability to create or modify Salesforce metadata from the integration account. All ongoing runtime operations continue to work without it.
✓ Verify: The permission is no longer checked under System Permissions.
| Problem | Likely cause | Fix |
|---|---|---|
| "Login failed" when testing in Configure Field Nation | Wrong username, password, or token | Re-verify all three; remember the token changes on every password reset |
| Cannot create the Workflow Rule during Configure Field Nation | Modify Metadata permission not granted | Verify Step 2b — System Permissions |
| Fields not visible in Field Nation mapper | Field-level security too restrictive | Return to Step 2d and grant Read on the missing field |
| Authentication fails despite correct credentials | IP restriction on the org | Add Field Nation's egress IPs to the trusted IP range under Setup → Network Access |
| MFA challenge appears during API call | MFA exemption not applied | Complete Step 6 |
| Flow not triggering | Flow is not Active, or entry conditions not met | Check Setup → Flows — status must be Active; verify the trigger field is set correctly on the record |
| Duplicate work orders being created | Both Workflow Rule and custom Flow are active | Deactivate the auto-created Workflow Rule if using a custom Flow |
If none of the above resolves your issue, contact Field Nation Support. Include the exact error message, which step you are on, and your Salesforce instance type (production or test).
Estimated time: ~35 minutes Access needed: Field Nation Company Admin Have ready: Reference sheet from Overview and credentials from Step 8 above
Install the Salesforce connector in Field Nation, authenticate it against your Salesforce org, map fields, enable sync features, and run end-to-end tests to confirm bidirectional data flow. By the end of this section the integration will be live.
Log in to Field Nation as a Company Admin and navigate to your environment:
| Environment | URL |
|---|---|
| Production | app.fieldnation.com/integrations |
| Sandbox | ui-sandbox.fndev.net/integrations |
Go to Marketplace
Find Salesforce in the connector list
Click Install (first time) or Configure (if already installed)
✓ Verify: You land on the Salesforce connector configuration page with a Settings tab visible.
Sandbox and production are fully isolated. Credentials, Trigger URLs, field mappings, and feature settings are not shared between environments. If you are validating in sandbox first, you will repeat this entire section for production using separate Salesforce credentials and a separate Trigger URL.
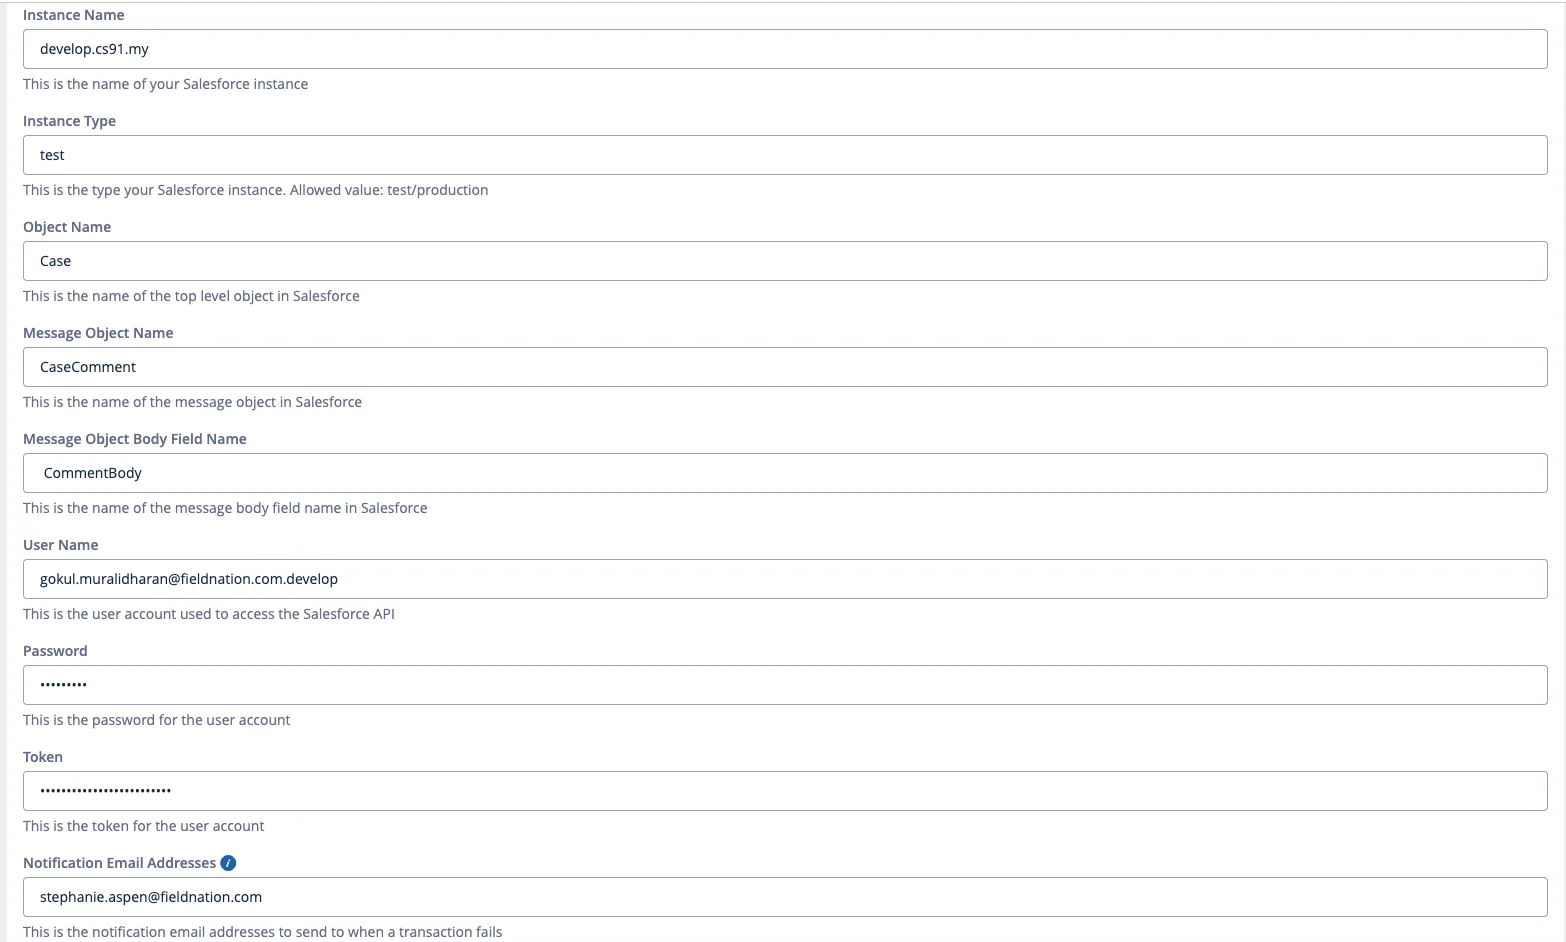
Fill in the identity fields for your Salesforce org. These tell the connector where to connect and which objects to work with.
| Field | Your value | Notes |
|---|---|---|
| Instance Name | (from Overview) | The subdomain of your Salesforce URL, e.g. myInstance. Used as a label — does not affect authentication. |
| Instance Type | production or test | production connects to login.salesforce.com. test connects to test.salesforce.com. |
| Object Name | (from Overview, e.g. Case) | The API name of the root Salesforce object. Custom objects use the __c suffix. |
| Message Object Name | (from Overview, e.g. CaseComment) | The child object used for work order messages. |
| Message Object Body Field Name | (from Overview, e.g. CommentBody) | The field on the message object that holds the message text. |
Instance Type must match your Salesforce org exactly. Connecting a test instance type to a production Salesforce org — or vice versa — will fail authentication even if the credentials are correct.
Enter the Salesforce integration user credentials from Configure Salesforce above.
| Field | Value | Security note |
|---|---|---|
| User Name | Full email address of the integration user | Stored as the identifier |
| Password | Integration user's password | Encrypted at rest with AES-256 |
| Token | Security token from Step 5 above | Encrypted at rest — entered separately, appended to password by the connector internally |
The Token field is separate from the Password field. Do not concatenate them yourself. Enter each value independently — the connector handles the combination.
The security token changes every time the Salesforce user's password is reset. If you rotate the password in Salesforce, you must update both the Password and Token fields here.
Optional:
| Field | Value | Notes |
|---|---|---|
| Notification Email Addresses | Comma-separated list | Recipients of failure alerts when a transaction cannot be processed |
| Salesforce Attachment Type | attachments or files | Defaults to attachments. Set to files if your org uses Salesforce Files (ContentVersion). |
Click Save. The connector will attempt to authenticate against Salesforce using the credentials you entered.
On success: A green confirmation message appears and a unique Trigger URL is generated. Continue to Step 5.
On failure: An error message describes the problem. Refer to the table below.
| Error message | Cause | Fix |
|---|---|---|
INVALID_LOGIN: Invalid username, password, security token | Wrong username, password, or outdated token | Verify all three. The token resets every time the password changes. |
| Connection timeout or auth failure | Instance type doesn't match Salesforce environment | Change Instance Type to match your org (production vs test) |
API_DISABLED_FOR_ORG | API Enabled permission not granted | Return to Step 2b |
LOGIN_MUST_USE_SECURITY_TOKEN or login failure | Field Nation IPs not in the org's trusted IP range | Add them under Salesforce Setup → Network Access |
| MFA challenge | MFA exemption not applied to the integration user | Complete Step 6 |
✓ Verify: Green confirmation message is visible and the page shows a Trigger URL.
After a successful connection test, Field Nation generates a unique Trigger URL:
https://api.fieldnation.com/integrations/trigger/{CLIENT_TOKEN}This is the endpoint where Salesforce sends Outbound Message payloads. The connector also uses its Modify Metadata permission at this point to automatically create a Salesforce Workflow Rule and Outbound Message on your configured root object — no manual Salesforce setup required.
Non-secret values are saved in your browser. Fields marked Not saved are held only until you reload — enter them directly into the connector form.
Treat this URL as a secret. Anyone with this URL can send payloads to your Field Nation integration. Do not commit it to version control or share it in public channels.
If you set up a custom Record-Triggered Flow in Step 7, return to that Flow now and connect the Outbound Message action. Then deactivate the Workflow Rule the connector auto-created to avoid duplicate work order creation.
Field mappings control which Salesforce fields populate which Field Nation work order fields. Navigate to each section in the left sidebar and configure mappings relevant to your workflow.
Account.Name, Contact.Email), formula fields, and picklist fieldsIf a field is missing from the dropdown, the integration user's field-level security does not include Read access on that field. Return to Step 2d and grant access, then click Refresh Fields again.
| Section | What it populates |
|---|---|
| Overview | Work order title, type, description |
| Schedule | Service date and time window |
| Location | Site address, city, state, zip |
| Pay | Pay rate and rate type |
| Expense | Expense allowance |
| Contacts | Manager and on-site contact |
| Service Description | Scope of work text |
| Client Documents | Imported attachments |
| Tasks | Work order checklist items |
| Buyer Custom Fields | Buyer-defined custom field values |
| Provider Custom Fields | Provider-facing custom field values |
| Assigned Provider | Preferred or required technician |
| Status Updates | Lifecycle event mappings |
| Time Log | Check-in and check-out times |
| Deliverables | Completion uploads and signatures |
| Finance | Invoice and payment fields |
| Dispatch | Auto-dispatch configuration |
| Messages | Work order message thread |
| Shipments | Shipment tracking data |
| Job Summary | Completion summary |
Map only the sections your workflow uses. Unmapped sections are ignored — you are not required to configure all of them.
Navigate to Settings in the integration and enable the features that match your workflow. Each feature has a corresponding Salesforce permission requirement.
| Feature | What it does | Salesforce permission needed |
|---|---|---|
| Auto Dispatch | Automatically dispatches the work order on creation | None beyond base permissions |
| Attachments Import | Pulls files from the Salesforce Case into Client Documents when the work order is created | Attachment or ContentVersion: Read |
| Attachments Export | Pushes provider-uploaded files back to Salesforce | Attachment or ContentVersion + ContentDocumentLink: Create |
| Work Order Signatures | Sends completion signatures to Salesforce as images | Same as Attachments Export |
| Access Control (Attachments) | Sets visibility (public/private) on attachments uploaded to Salesforce | Same as Attachments Export |
| Messages | Syncs the work order message thread to and from Salesforce | CaseComment or Note: Read, Create |
| Access Control (Inbound Messages) | Sets visibility for messages sent to Salesforce | Same as Messages |
| Access Control (Outbound Messages) | Sets visibility for messages received from Salesforce | Same as Messages |
| Outbound Create | Creates a Salesforce Case when a Field Nation work order is created | Case (or root object): Create |
| Inbound UTC as UTC | Treats inbound UTC service dates as UTC instead of converting to local time | None |
| Saved Location Setting | Controls whether to reuse saved locations or allow duplicates | None |
Only enable features you intend to use. Enabling a feature without the corresponding Salesforce permission will cause that operation to fail silently — visible in Event History.
Click Save to finalize the configuration, then run both tests below to confirm bidirectional sync is working.
create_external event appears with a success statusGo to Integrations → Event History to see the log of all integration events.
| Status | Meaning |
|---|---|
success | Event processed and synced successfully |
failed | Event received but processing failed — expand the row for the error detail |
pending | Event queued, not yet processed |
Each work order sync consumes 2–3 Salesforce API calls. Monitor daily API usage under Salesforce Setup → Company Information if you have high work order volume. Enterprise orgs have a minimum of 1,000 calls/day; Unlimited orgs have 5,000.
✓ Verify: Both the inbound and outbound tests show success in Event History.
Now that the connection is confirmed, return to Salesforce and remove the setup-only permission:
Modify Metadata Through Metadata API FunctionsThis is Step 9 of Configure Salesforce.
If you skip this step, the integration user retains the ability to create, modify, or delete Salesforce metadata — including Workflow Rules, Outbound Messages, and Apex classes — through the API. This is a permanent elevated privilege until explicitly revoked. Remove it now that setup is confirmed.
Use this checklist to track progress. Completed stages collapse automatically — click any item's arrow icon to jump directly to that step.
Progress is saved in your browser. Run this checklist once per environment (sandbox then production).
Next: Workflow Setup — Create Salesforce Flows and Outbound Messages.
Last updated on