Field NationDeveloper Platform
Pre-built ConnectorsGetting Started

PSA Platforms

CRM & Support

Salesforce ConnectorConfigurationWorkflow Setup

ERP & Project Management

Universal

PlatformsSalesforce

Configuration

Configure the Salesforce connector in Field Nation's Integration Broker to establish API connection and field mappings.


Prerequisites Checklist

Before starting, gather this information:

  • ☐ Salesforce username (email address)
  • ☐ Salesforce password
  • ☐ Salesforce security token (how to generate)
  • ☐ Salesforce object API name (e.g., Case, Service_Ticket__c)
  • ☐ Instance type (production vs sandbox)
  • ☐ Admin access to Field Nation integrations

Step 1: Access Integration Broker

Navigate to Field Nation's Integration Broker interface:

Sandbox: ui-sandbox.fndev.net/integrations Production: app.fieldnation.com/integrations

Log In

Use your Field Nation buyer account credentials

Select Salesforce

Find "Salesforce" in the list of available connectors

Click Configure

Open the Salesforce configuration form


Step 2: Basic Settings

Salesforce Settings

Instance Name

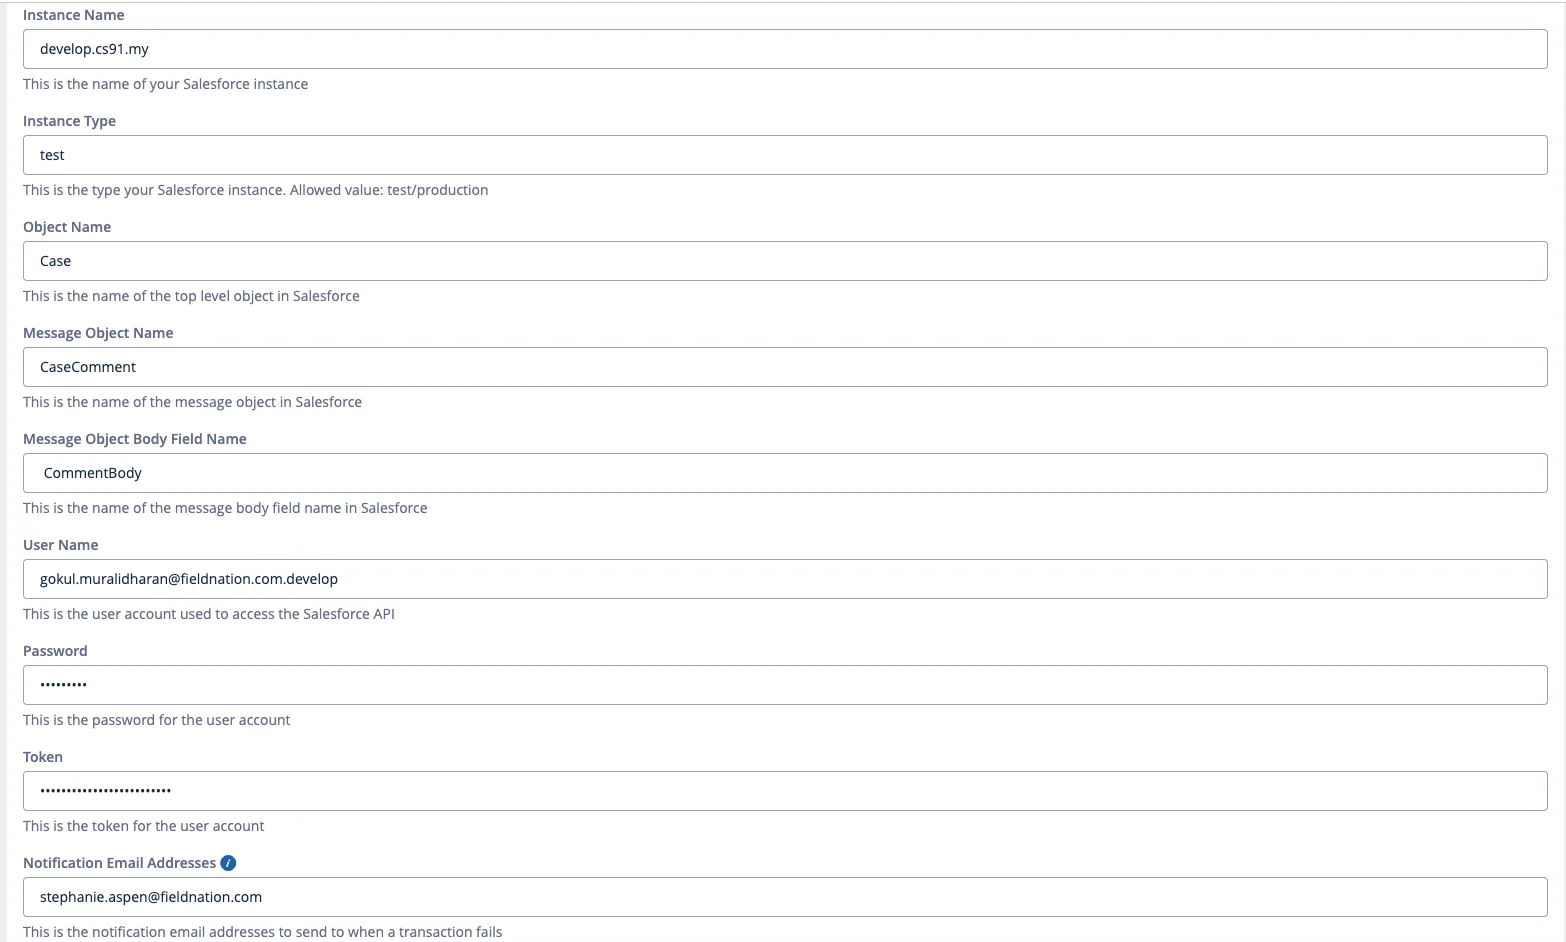
Optional but recommended - Descriptive name to identify this integration.

Examples:

  • "Production Salesforce"
  • "Service Cloud - NA"
  • "Customer Service Sandbox"

Use Case: Helpful when managing multiple Salesforce integrations or distinguishing between sandbox and production.


Instance Type

Required - Specifies which Salesforce environment to connect to.

Value: production

Connects to: login.salesforce.com

When to use:

  • Live Salesforce organization
  • Go-live / production deployment
  • Real customer data

Value: test

Connects to: test.salesforce.com

When to use:

  • Salesforce sandbox environments
  • Development and testing
  • UAT (User Acceptance Testing)
  • Training environments

Critical: Incorrect instance type causes authentication failures. Verify your Salesforce environment type before configuring.


Object Name

Required - The Salesforce object API name for integration.

Standard Objects:

  • Case - Service cases
  • Opportunity - Sales opportunities
  • Account - Customer accounts
  • Contact - Individual contacts

Custom Objects:

  • Service_Ticket__c - Custom service ticket
  • Field_Service_Request__c - Custom FSM object
  • Work_Request__c - Custom work request

Format Rules:

  • Use API name, not label
  • Standard objects: Same as label (Case)
  • Custom objects: End with __c (My_Object__c)

Field Access:

  • All fields on the base object
  • Fields from directly related parent objects
  • Example: If object = Case, you can access Case.Account.Name, Case.Contact.Email, etc.

Step 3: Messaging Configuration

Optional - Enable bidirectional comment synchronization.

Example Configuration:

Message Object: CaseComment
Object Body Field: CommentBody

Step 4: Credentials

Salesforce authentication requires three components:

Username

Your Salesforce user's email address.

Format: Full email (e.g., integration@company.com)

Best Practice: Use dedicated integration user, not personal account

  • Better security and audit trails
  • Integration won't break if personal account deactivated
  • Easier permission management

Password

Your Salesforce user's password.

Security Notes:

  • Field Nation encrypts passwords at rest (AES-256)
  • Never logged or exposed in error messages
  • Rotate periodically for security

Security Token

System-generated key from Salesforce for API authentication.

How to Generate Security Token

Log into Salesforce

Use the account you're configuring for integration

Navigate to Personal Settings

Click your profile icon → Settings (or Setup → My Personal Information)

Reset Security Token

Find "Reset My Security Token" and click it

Check Email

Salesforce emails the token to your registered email address

Copy Token

Copy the token from the email (entire string)

Enter in Field Nation

Paste token in the Token field (do NOT append to password)

Token Behavior:

  • Token is appended to password during API authentication
  • Field Nation handles this automatically
  • Enter as separate field, not concatenated with password

When Token Resets:

  • Password change resets token automatically
  • Manual reset via "Reset My Security Token"
  • You'll need to update Field Nation configuration

Step 5: Test Connection

After entering all configuration details:

Save Configuration

Click "Save" or "Test Connection" button

Authentication Test

Integration Broker attempts to authenticate with Salesforce

Review Result

  • Success: Green confirmation, trigger URL generated
  • Failure: Error message with details

Common Authentication Errors


Step 6: Get Trigger URL

Once authentication succeeds, Field Nation generates your unique trigger URL.

Trigger Information

Trigger URL Components

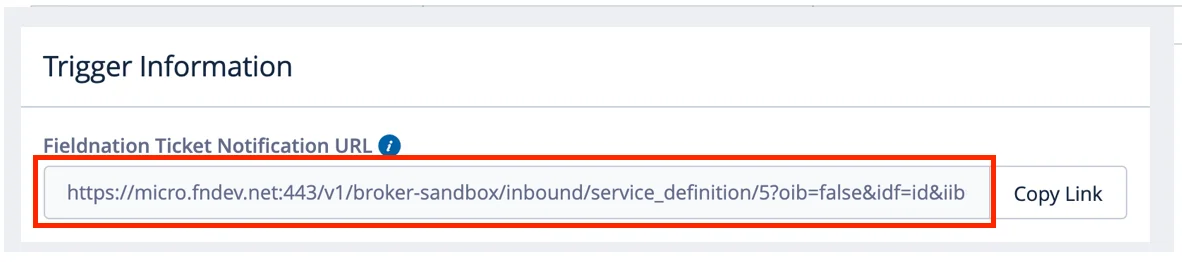
https://api.fieldnation.com/integrations/trigger/{CLIENT_TOKEN}
  • Base URL: Field Nation API endpoint
  • Client Token: Unique authentication token for your integration

Using the Trigger URL

Purpose: Destination for Salesforce Outbound Messages

You'll need this URL when:

  • Configuring Salesforce Outbound Message
  • Setting up Flow actions
  • Testing webhook connectivity

Copy the URL - You'll paste this into Salesforce in the next step.

Security: The client token in the URL authenticates incoming webhooks. Keep this URL secure (don't share publicly).


Step 7: Field Mappings

Configure how data maps between Salesforce and Field Nation.

Access Field Mapping UI

  1. From Salesforce connector settings
  2. Click "Field Mappings" tab
  3. Click "Refresh Fields" to discover Salesforce fields

Discover Available Fields

Automatic Discovery:

  • Integration Broker queries Salesforce metadata API
  • Retrieves all fields on base object
  • Discovers related object fields
  • Populates mapping dropdown menus

Includes:

  • Standard fields (Subject, Description, Status)
  • Custom fields (My_Custom_Field__c)
  • Related fields (Account.Name, Contact.Email)
  • Formula fields (calculated values)
  • Picklist fields (enum values)

Configure Mappings

Inbound (Salesforce → Field Nation):

Map Salesforce fields to Field Nation work order fields:

  • Case.Subject → title
  • Case.Description → description
  • Case.Account.Name → location.company.name
  • Case.Priority → priority (with array map)

Outbound (Field Nation → Salesforce):

Map Field Nation events to Salesforce updates:

  • Work order status → Case Status
  • Completion notes → Case Comments
  • Technician name → Custom field

Complete field mapping guide →


Step 8: Save & Test

Final Configuration Steps

Review Settings

Verify all configuration values correct:

  • Instance type matches environment
  • Object name correct
  • Credentials valid
  • Field mappings complete

Save Configuration

Click "Save" to persist settings

Test with Sample Record

Create a test record in Salesforce:

  1. Create a simple Case/record
  2. Update to meet Flow trigger conditions
  3. Check Integration Broker logs
  4. Verify work order created in Field Nation

Monitor Initial Syncs

Watch first few synchronizations:

  • Check for errors in logs
  • Verify field values correct
  • Confirm bidirectional sync works
  • Adjust mappings if needed

Configuration Checklist

Use this checklist to verify complete setup:

Field Nation Configuration

  • ☐ Instance name configured (optional)
  • ☐ Instance type matches Salesforce environment
  • ☐ Object name is correct API name
  • ☐ Messaging configured (if needed)
  • ☐ Credentials entered (username, password, token)
  • ☐ Connection tested successfully
  • ☐ Trigger URL copied
  • ☐ Fields refreshed and discovered
  • ☐ Inbound field mappings configured
  • ☐ Outbound field mappings configured (if needed)
  • ☐ Configuration saved

Salesforce Configuration (Next Steps)

  • ☐ Outbound Message created
  • ☐ Record-Triggered Flow created
  • ☐ Flow conditions defined
  • ☐ Flow activatedFlow tested with sample record

Salesforce workflow setup →


Troubleshooting


Last updated on

Salesforce Connector

Integrate Salesforce CRM with Field Nation for automated work order creation and bidirectional status synchronization.

Workflow Setup

Create Salesforce Flows and Outbound Messages to automatically send work order data to Field Nation.

On this page

Prerequisites Checklist
Step 1: Access Integration Broker
Log In
Select Salesforce
Click Configure
Step 2: Basic Settings
Instance Name
Instance Type
Object Name
Step 3: Messaging Configuration
Step 4: Credentials
Username
Password
Security Token
How to Generate Security Token
Log into Salesforce
Navigate to Personal Settings
Reset Security Token
Check Email
Copy Token
Enter in Field Nation
Step 5: Test Connection
Save Configuration
Authentication Test
Review Result
Common Authentication Errors
Step 6: Get Trigger URL
Trigger URL Components
Using the Trigger URL
Step 7: Field Mappings
Access Field Mapping UI
Discover Available Fields
Configure Mappings
Step 8: Save & Test
Final Configuration Steps
Review Settings
Save Configuration
Test with Sample Record
Monitor Initial Syncs
Configuration Checklist
Field Nation Configuration
Salesforce Configuration (Next Steps)
Troubleshooting