Step-by-step guide to creating and configuring webhooks using the Web UI or REST API with examples for both methods.
Before creating a webhook, ensure you have:
client_id and client_secret)Best for:
Sandbox: https://ui-sandbox.fndev.net/integrations/webhooks
Production: https://app.fieldnation.com/integrations/webhooks
Located in the top-right corner of the dashboard.
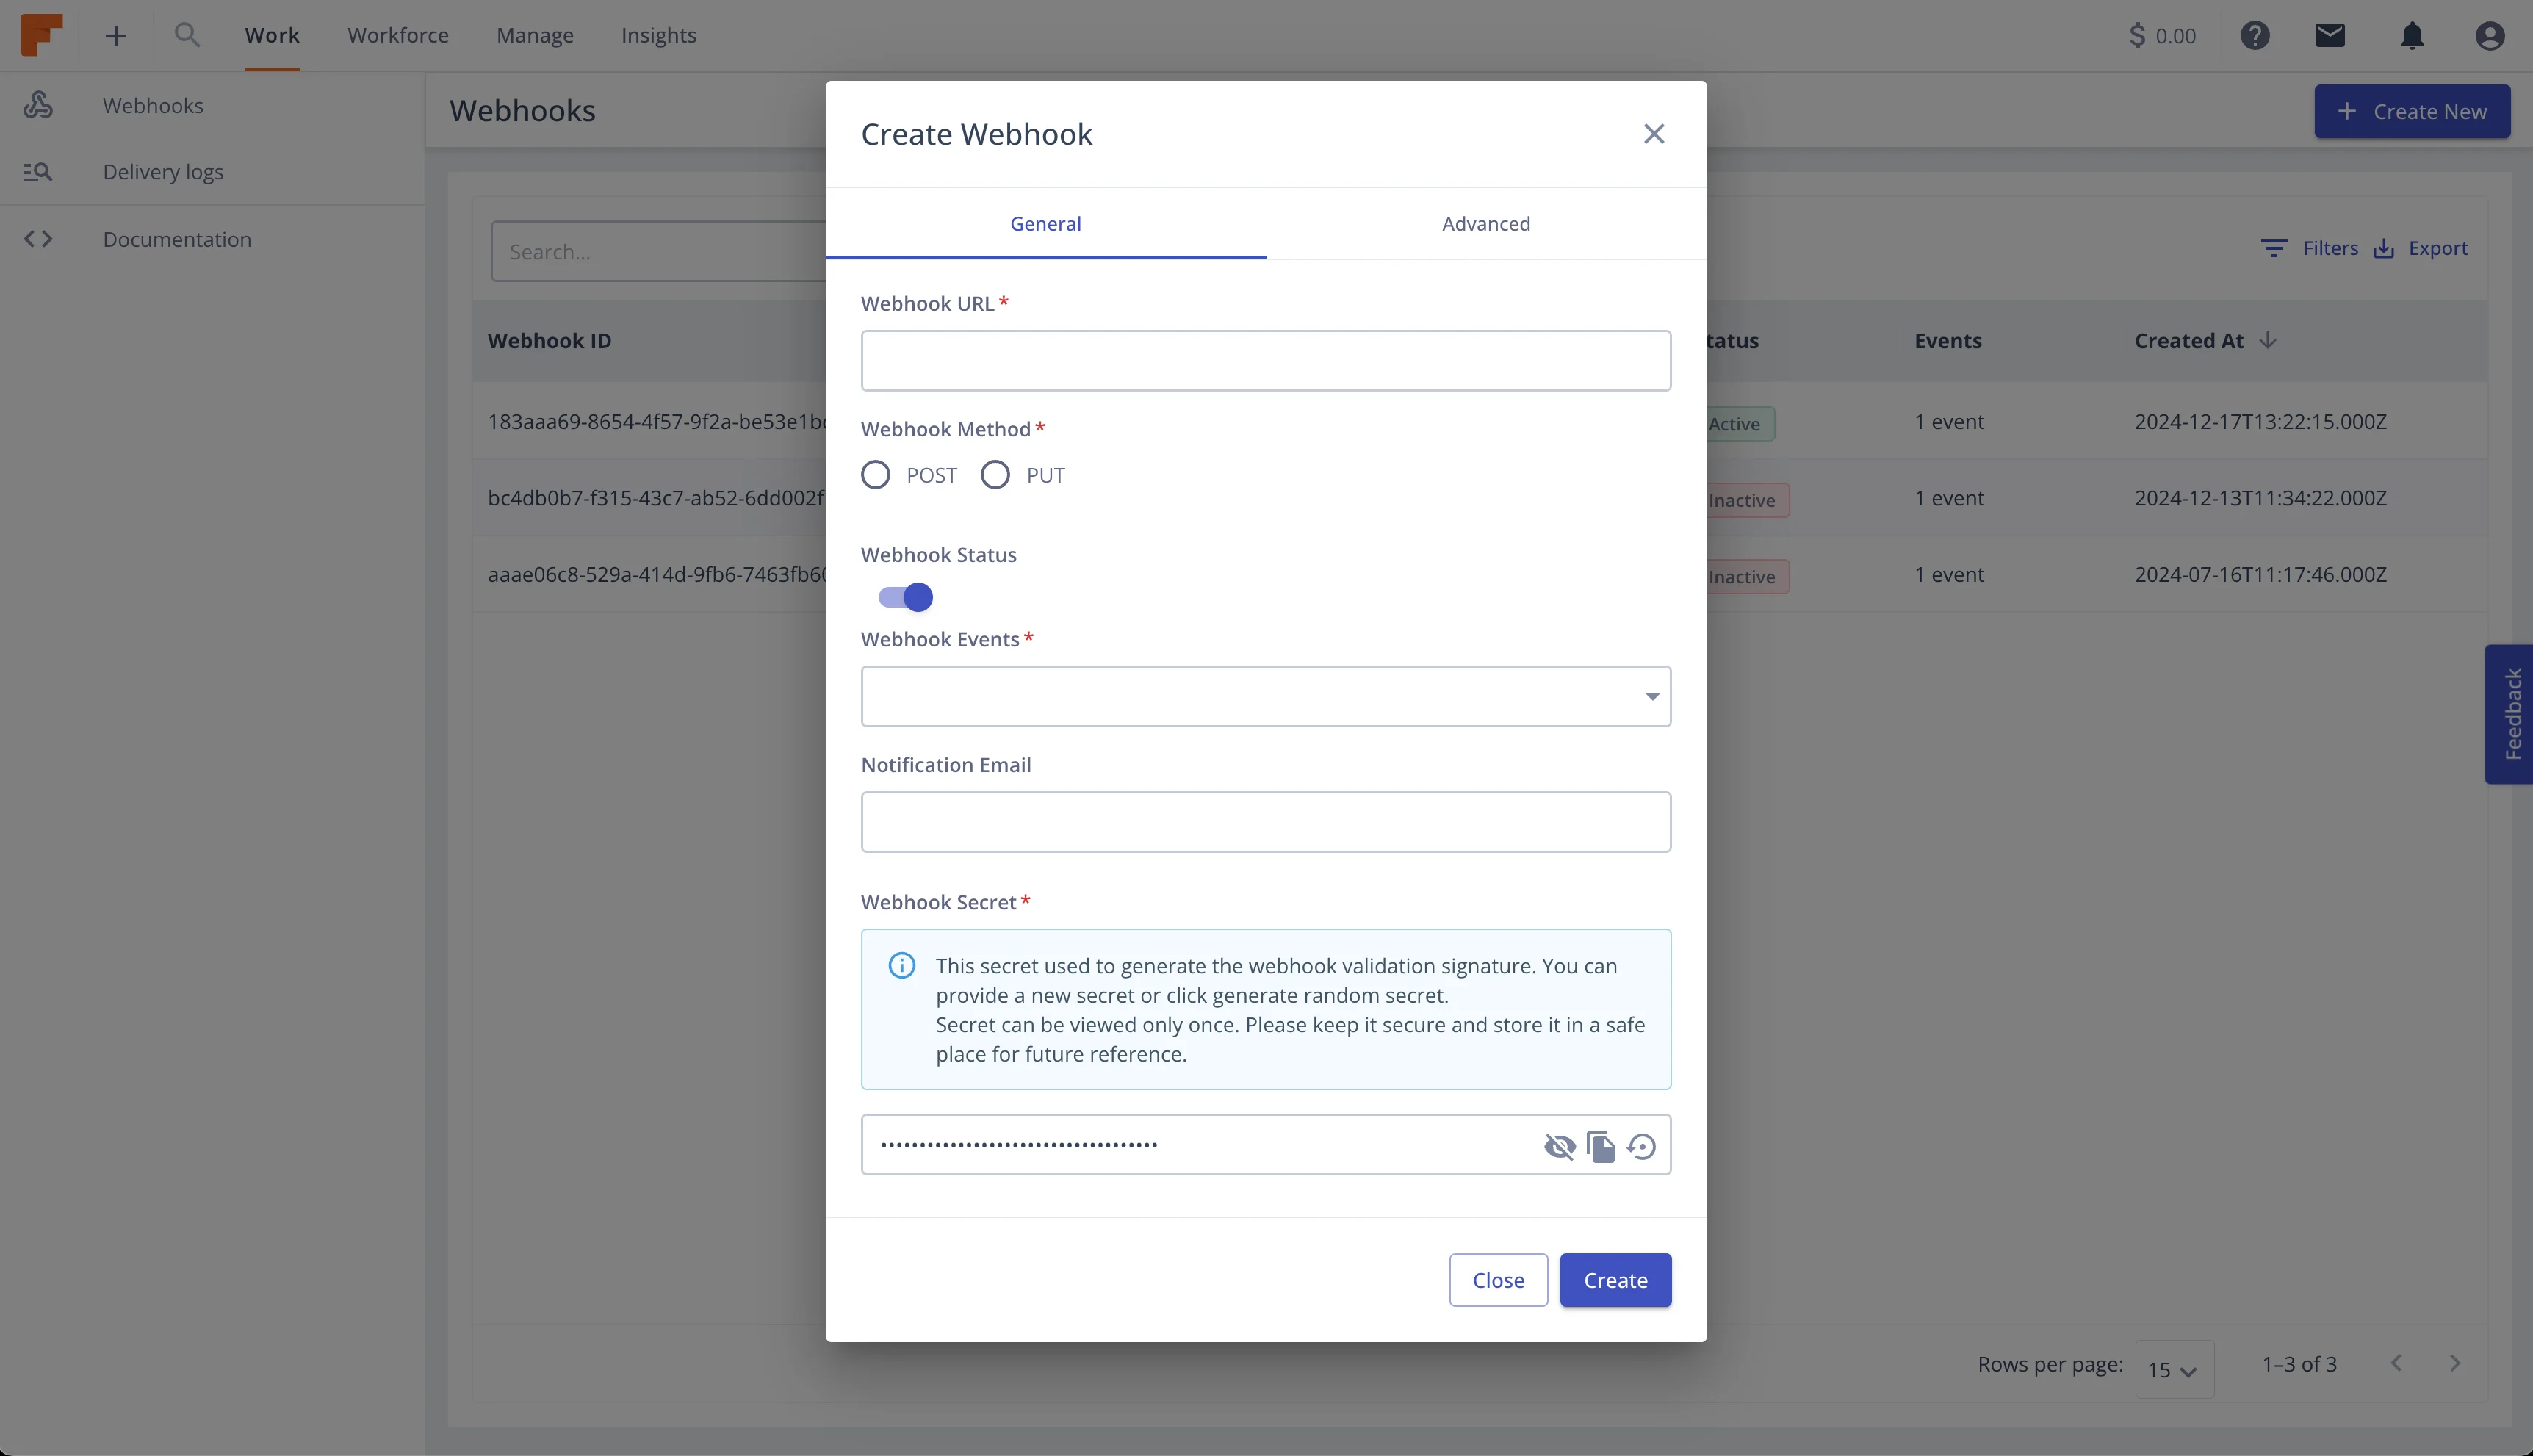
Fill in the required fields:
Webhook URL:
https://your-endpoint.com/webhooks)HTTP Method:
Status:
Choose which events trigger this webhook:
Option 1: Select All Events
Option 2: Select Specific Events
Recommendation: Start with a small set of events (4-6), then expand as needed. Subscribing to unused events creates unnecessary processing overhead.
Click "Advanced Settings" to configure:
Notification Email:
Custom Headers:
Example:
Authorization: Bearer your-api-token
X-Custom-ID: integration-prod
X-Environment: production
Reserved Prefix: Headers cannot start with x-fn- (reserved for Field Nation).
Secret Key:
Advanced Settings:
After Creation: The webhook is immediately active if status was set to "active". Test by triggering an event!
Best for:
curl -X POST https://api-sandbox.fndev.net/authentication/api/oauth/token \
  -H "Content-Type: application/x-www-form-urlencoded" \
  -d "grant_type=client_credentials" \
  -d "client_id=YOUR_CLIENT_ID" \
  -d "client_secret=YOUR_CLIENT_SECRET"
Response:
{
  "access_token": "eyJhbGciOiJSUzI1NiIsInR5cCI6IkpXVCJ9...",
  "token_type": "Bearer",
  "expires_in": 3600
}curl -X POST https://api-sandbox.fndev.net/api/v1/webhooks \
-H "Authorization: Bearer YOUR_ACCESS_TOKEN" \
-H "Content-Type: application/json" \
-d '{
"url": "https://your-endpoint.com/webhooks",
"method": "post",
"status": "active",
"events": [
"workorder.created",
"workorder.status.published",
"workorder.status.assigned",
"workorder.status.work_done",
"workorder.status.approved"
],
"notificationEmail": "webhook-alerts@example.com"
}'Response:
{
  "metadata": {
    "timestamp": "2026-01-15T10:30:00Z"
  },
  "result": {
    "id": 123,
    "webhookId": "wh_abc123def456",
    "companyId": 789,
    "userId": 456,
    "url": "https://your-endpoint.com/webhooks",
    "method": "post",
    "status": "active",
    "secret": "01999f51-5c66-4449-b441-6b4a053fee6a",
    "events": [
      "workorder.created",
      "workorder.status.published",
      "workorder.status.assigned",
      "workorder.status.work_done",
      "workorder.status.approved"
    ],
    "notificationEmail": "webhook-alerts@example.com",
    "modelProperties": [],
    "isIntegrationOnly": false,
    "createdAt": "2026-01-15T10:30:00Z",
    "updatedAt": "2026-01-15T10:30:00Z"
  }
}
Save the secret! The secret field is only returned during creation. Store it securely—you'll need it for signature verification.
curl -X GET https://api-sandbox.fndev.net/api/v1/webhooks/wh_abc123def456 \
-H "Authorization: Bearer YOUR_ACCESS_TOKEN"Prop
Type
Description
urlstringHTTPS endpoint URL where webhook notifications will be sent. Must be publicly accessible and use HTTPS.
methodstring (enum)HTTP method for delivery. Values: `post` (recommended) or `put`.
statusstring (enum)Initial webhook status. Values: `active`, `inactive`, `archived`.
eventsarray<string>Array of event names to subscribe to. Must contain at least 1 event. See [event catalog](/docs/webhooks/concepts/events) for complete list.
Prop
Type
Description
secret?string (UUID)Custom secret for HMAC-SHA256 signing. Auto-generated if omitted. Must be valid UUID format.
notificationEmail?string (email)Email address to receive delivery failure notifications and alerts.
isIntegrationOnly?booleanWhether webhook is restricted to API-only access. Default: false.
webhookAttribute?objectCustom headers and legacy field mappings.
webhookScript?objectPayload customization configuration. Contains `scriptLanguage` (jsonata or json), `script` (transformation script), and `enabled` (boolean toggle). See [Payload Customization Guide](/docs/webhooks/guides/payload-customization).
Subscribe to single event:
{
  "url": "https://your-endpoint.com/webhooks",
  "method": "post",
  "status": "active",
  "events": ["workorder.status.published"]
}Full configuration with custom headers and notifications:
{
  "url": "https://api.example.com/integrations/fieldnation/webhooks",
  "method": "post",
  "status": "active",
  "events": [
    "workorder.created",
    "workorder.status.published",
    "workorder.status.assigned",
    "workorder.status.checked_in",
    "workorder.status.work_done",
    "workorder.status.approved",
    "workorder.status.paid"
  ],
  "secret": "f47ac10b-58cc-4372-a567-0e02b2c3d479",
  "notificationEmail": "integrations-alerts@example.com",
  "webhookAttribute": {
    "header": {
      "Authorization": "Bearer prod-api-token-xyz",
      "X-Webhook-Environment": "production",
      "X-Webhook-Version": "v1",
      "X-Team-Owner": "integrations"
    }
  }
}Create separate webhooks for different environments:
{
  "url": "https://dev.example.com/webhooks",
  "method": "post",
  "status": "active",
  "events": ["workorder.created", "workorder.status.published"],
  "notificationEmail": "dev-team@example.com",
  "webhookAttribute": {
    "header": {
      "X-Environment": "development"
    }
  }
}
{
"url": "https://staging.example.com/webhooks",
"method": "post",
"status": "active",
"events": [
"workorder.created",
"workorder.status.published",
"workorder.status.assigned",
"workorder.status.work_done"
],
"notificationEmail": "staging-alerts@example.com",
"webhookAttribute": {
"header": {
"X-Environment": "staging"
}
}
}{
"url": "https://api.example.com/webhooks",
"method": "post",
"status": "active",
"events": [
"workorder.created",
"workorder.status.published",
"workorder.status.assigned",
"workorder.status.checked_in",
"workorder.status.work_done",
"workorder.status.approved",
"workorder.status.paid",
"workorder.problem_reported"
],
"notificationEmail": "prod-alerts@example.com",
"webhookAttribute": {
"header": {
"Authorization": "Bearer prod-api-token",
"X-Environment": "production"
}
}
}Custom headers are sent with every webhook delivery:
{
  "webhookAttribute": {
    "header": {
      "Authorization": "Bearer your-api-token",
      "X-API-Key": "your-api-key"
    }
  }
}{
"webhookAttribute": {
"header": {
"X-Webhook-ID": "prod-wh-001",
"X-Environment": "production",
"X-Version": "v1",
"X-Owner": "integrations-team"
}
}
}Best Practice: Use custom headers for authentication instead of query parameters. Headers are encrypted in transit and stored encrypted in the database.
Subscribe only to critical lifecycle events:
{
  "events": [
    "workorder.status.published",
    "workorder.status.assigned",
    "workorder.status.work_done",
    "workorder.status.approved"
  ]
}
Use When: Building MVP or simple integration
Benefits: Minimal processing, easy to test, focused integration
Subscribe to complete status lifecycle:
{
  "events": [
    "workorder.status.published",
    "workorder.status.confirmed",
    "workorder.status.assigned",
    "workorder.status.on_my_way",
    "workorder.status.checked_in",
    "workorder.status.checked_out",
    "workorder.status.work_done",
    "workorder.status.approved",
    "workorder.status.paid",
    "workorder.status.cancelled"
  ]
}
Use When: Need complete visibility into work order progress
Benefits: Real-time dashboards, detailed tracking, comprehensive sync
Subscribe to work order activities:
{
  "events": [
    "workorder.message_posted",
    "workorder.provider_upload",
    "workorder.task_completed",
    "workorder.schedule_updated",
    "workorder.problem_reported",
    "workorder.problem_resolved"
  ]
}
Use When: Monitoring provider activity and work progress
Benefits: Track communications, document uploads, task completion
Subscribe to everything:
{
  "events": [
    "workorder.created",
    "workorder.routed",
    // ... all 33 events
  ]
}
Use When: Building comprehensive integration or analytics
Caution: High event volume, requires robust processing
resource "fieldnation_webhook" "production" {
  url    = "https://api.example.com/webhooks"
  method = "post"
  status = "active"

  events = [
    "workorder.status.published",
    "workorder.status.assigned",
    "workorder.status.work_done",
    "workorder.status.approved"
  ]

  notification_email = "prod-alerts@example.com"

  custom_headers = {
    "Authorization" = "Bearer ${var.api_token}"
    "X-Environment" = "production"
  }
}const fetch = require('node-fetch');
async function createWebhook(config) {
// Get access token
const tokenResponse = await fetch(
'https://api-sandbox.fndev.net/authentication/api/oauth/token',
{
method: 'POST',
headers: { 'Content-Type': 'application/x-www-form-urlencoded' },
body: new URLSearchParams({
grant_type: 'client_credentials',
client_id: process.env.FN_CLIENT_ID,
client_secret: process.env.FN_CLIENT_SECRET
})
}
);
const { access_token } = await tokenResponse.json();
// Create webhook
const webhookResponse = await fetch(
'https://api-sandbox.fndev.net/api/v1/webhooks',
{
method: 'POST',
headers: {
'Authorization': `Bearer ${access_token}`,
'Content-Type': 'application/json'
},
body: JSON.stringify(config)
}
);
const webhook = await webhookResponse.json();
console.log('Webhook created:', webhook.result.webhookId);
console.log('Secret:', webhook.result.secret);
return webhook.result;
}
// Usage
createWebhook({
url: 'https://your-endpoint.com/webhooks',
method: 'post',
status: 'active',
events: ['workorder.status.published', 'workorder.status.assigned'],
notificationEmail: 'alerts@example.com'
});Create webhooks in inactive state for safe testing:
{
  "status": "inactive",
  // ... other config
}
Activate after verifying endpoint:
curl -X PUT https://api-sandbox.fndev.net/api/v1/webhooks/wh_abc123 \
  -H "Authorization: Bearer YOUR_ACCESS_TOKEN" \
  -H "Content-Type: application/json" \
-d '{"status": "active"}'{
"notificationEmail": "webhook-prod-team-integrations@example.com"
}Benefits:
const crypto = require('crypto');
const uuid = require('uuid');

// Option 1: UUID v4
const secret = uuid.v4();

// Option 2: Random hex
const secret = crypto.randomBytes(32).toString('hex');Maintain a registry:
| Webhook ID | Environment | Events | Owner | Purpose |
|------------|-------------|--------|-------|---------|
| wh_prod_01 | Production | Status changes | Integrations | Salesforce sync |
| wh_prod_02 | Production | All events | Analytics | Data warehouse |
| wh_dev_01 | Development | Core events | Dev Team | Local testing |
Last updated on